Guide to Pro Pinball Timeshock!
by Jens Goering
last change: 09/27/2012Es gibt auch eine Deutsche Version dieser Anleitung

Introduction: Timeshock! is the second pinball simulation in the Pro Pinball series from Empire Interactive. The first one, The Web, was the only pinball simulation that gave you the real feeling of a pinball machine until Timeshock! hit the market. With even improved physics, Timeshock! beats everything up to date.
I am going to explain the rules of Timeshock! as far as I know them. There are quite a few things missing and if you know anything I missed please let me know and I will add it. If you have got questions or comments, please contact me me at my email address.
My email-address is
WARNING:
This text contains secrets, Easter eggs and spoilers.I presume that the factory settings are set and that you use version 1.07 of the game. It is strongly recommended to use version 1.07, since there are some bugs fixed, the game runs faster and highscore codes from older versions are not accepted in the official highscore list any more.
I hope you have as much fun with the game as I have.
Contents:
- FAQ
- Commandline switches
- Key-functions
- Gamemodes
- The Story
- Target description
- Feature description
- Ball saver
- Skill shot
- Secret skill shot
- Bonus multiplier
- Bonus
- Credits
- Superjets
- Awards
- Paradox awards
- Quickshots
- Souvenirs
- Ways
- Combos
- Reverse combos
- Continents
- Global Domination
- Explorations
- Scanner
- Superscanner
- Videomode
- Ramp Rampage
- Quickshot mania
- Superspinner
- Time warp frenzy
- Super time warp frenzy
- Time machine frenzy
- Time travel
- Reverse frenzy
- Midnight madness
- Timeshock frenzy
- Wizard frenzy
- Strategies
- Links
- Acknowledgements
- Availability
FAQ: Please read this before sending me a message with a question regarding Timeshock!
- Where can I get the demo of Timeshock! ?
http://www.empire.co.uk/propinball/timeshock/index.htm- Where can I get the update?
http://www.empire.co.uk/propinball/timeshock/index.htm- Where can I buy Timeshock! in [some part of the world, esp. USA]?
Since I live in Germany (where it is no problem to buy Timeshock!), I don't know about that. Take a look in rec.games.pinball.- I want to change a setting, but nothing happens and the word 'locked' is written behind it?
This setting is still locked.- How can I change the locked settings
Play. The settings will unlock themselves after some time.- When will that be?
In version 1.00 it took 40 to 50 hours pure playing time. In newer versions, this time is reduced, but I don't know how long it will take there. Some of the settings will be accessible earlier than others.- Is there a cheat or a possibility to unlock the locked settings immediately?
Get a copy of the game.dat file from someone who already has access to the settings. This way you will probably loose all your settings and/or highscores. No, I will not send any copy of my game.dat file to anyone.
There is also a cheat:
In the operator's menu, go to 2.2.1 and set starting time zone to RANDOM. Without leaving the menu, go directly to 3.1.47 and hold both flipper buttons for a couple seconds.- Which version of Timeshock! do I have to play to get into the official highscore listing?
V 1.07- Where can I see the highscore code?
Press both flipperbuttons directly after the game.- Can I play Timeshock! without the CD?
No.
Commandline switches: The following commandline switches can be used with both the DOS and the Windows95 version:
- q - Start the game immediately (skip the title screens)
- a - Go to the options immediately
- d[n] - Change the size of the dotmatrix display (n:0-5)
- s - Start without sounds
- x - Secure graphic settings for options
- g - starts a new GFX-graphic-adaptor-test in Windows95
Keyfunctions: Before a game:
- The start button starts a game.
- To activate the Tournament mode, hold the right flipperbutton.
- To activate the Challenge mode, hold the left flipperbutton.
- To activate the operator menue, hold the launch button and press the start button.
- Press escape to activate the menue.
During a game:
- At the start of the game you have to choose with the flipper buttons between the Novice mode and the normal mode (It is possible to deactivate this in the operators menue).
- Press the start button during the first ball to add players.
- After the first ball, the start button starts a new game.
- Hold the start and the launch button to activate the attract mode again (useful to eject all balls from all locks before starting a new game).
- Hold a flipper button to see the status screens. The other flipper button switches between the screens. Switching through all the screens (and not pressing the second flipper button again) prevents the status screens from re-appearing. This is useful in the Europe exploration.
- Press escape to activate the menue.
After a game:
- Hold both flipper buttons to see the highscore code.
Gamemodes In this mode, there are no extraballs and all random things are removed. Therefor, this mode is best for a tournament. Here is a list of differences to the normal mode:
- No ballsaver at the start of a ball.
- No extraballs. Instead you get big points (always 25M, this has nothing to do with the big points you get for continents).
- No buy-in-extraballs.
- Paradox award always is 99.990.
- Small points always is 100K.
- Very small points always is 10.
- Very Big Points always is 100M.
- The behavior of the scanner and the superscanner is different. The first two scanner always are 'advance quickshot' and 'advane award', the first superscanner is always 'light all quickshots' and 'light all awards'. You CAN get awards that make no sence; I once had the choice between the above two, when I had allquickshots and awards lit.
All players play the same game. Each has his own score. This means that you have to try to start the highscoring modes before you loose the ball - if not, the next player will get the points. No buy-in-extraballs. In the whole game, there are only 10 extraballs (As I said, it is ONE game ;).
This mode is for beginners. You get only one ball, but a ballsaver, that lasts 120 seconds. No buy-in-extraballs. You start in a random timezone and all empty continents are spotted. Thus, every hit of the upper ramp starts an exploration.
The Story: In the distant future, a scientist created a shock-wave of anti-time, which is travelling backwards through time. You have to collect four fragments of a time crystal in four different timezones to create a second shock-wave which will eliminate the first one. This is done in the time machine frenzy, the most important multiball of the game. You'll need to explore continents to find Tachyonium to power your timedrive to reach all timezones.
As soon as you collected all four crystal fragments, you can start timeshock frenzy in which you have to put them together to save the world. If you succeed in this and collected all eight pieces of tachyonium (you only need three to save the world), you can start the wizard mode, which is the most challenging award in Timeshock!.
Target description: Click on a target to jump to the description.
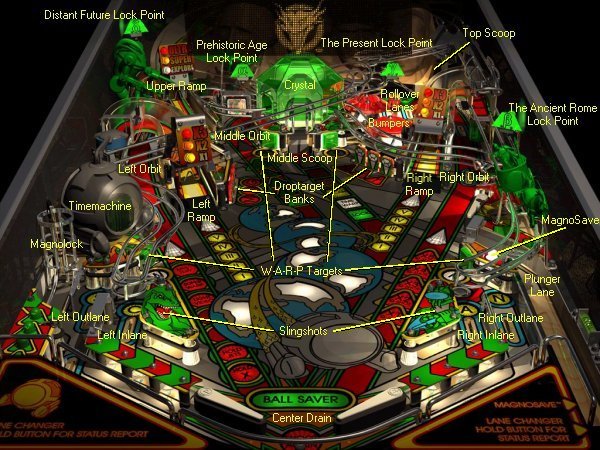
In clockwise order from bottom left and named as in the manual.
- Left inlane:
Contains the C of S-C-A-N. Scores 5K if you light the C, 1110 if you don't. Complete S-C-A-N to light scan. Complete S-C-A-N five times to light superscan. The superscanner will be lit again when you complete S-C-A-N five times AFTER the last one was collected. The S-C-A-N-lights can be cycled with the flipper buttons. The S-C-A-N-lights are unlit at the beginning of a new ball.- Left outlane:
Contains the S of S-C-A-N. Same scores as above. Has a rescue gate leading to the inlane scoring the 'Lucky!'-award of 5M, except in multiballs. If the ball goes through the left outlane nudge the table to the right at the moment the ball is besides the rescue gate. If you are lucky, you will move the pin left of the gate against the ball and this will send the ball through the gate.- Time machine with magnolock.
If the middle orbit is lit for lock and you hit it, the ball comes here. Feeds to the left flipper through the rescue gate. (No 'Lucky!-award in that case) See time machine frenzy. The magnolock has three lights below. Flashing lights indicate number of balls ready to lock. Lit lights indicate locked balls. (not necessarily the same as balls in lock.)- W-target:
The W of W-A-R-P. Each one scores 1K if unlit. Score if lit? Hittable from the right flipper. Often hit if you try to slingshot-pass from left to right and wait too long. Complete W-A-R-P in the right order to light time warp frenzy.- Left orbit:
Easily hit from the right flipper. Most balls going here hit the top scoop. Contains two switches so the machine knows in which direction the ball moves through the orbit. See awards, reverse combo and paradox award.- Left ramp:
Easily hit from the right flipper. Powers the time machine (see travel). Scores 100K and feeds to the left inlane. Also used to score ways (see ways). When you aim for this and you shoot too early, the ball will often hit the edge between the left ramp and the left target bank and go towards the center drain.- Left target bank (M-A-G):
Easy to hit from the upper flipper. The G is usually hit when you shoot the middle orbit and hold the upper flipper up. Each target scores 5K. Light the next award in the left orbit if all three are hit. Re-lights MagnoSave(TM) if all six targets (M-A-G-N-E-T) are hit. The unlit M-A-G-N-E-T lights indicate the missing drop targets for MagnoSave(TM). All targets are reset at the beginning of a new ball.
In time machine frenzy, time warp frenzy and super time warp frenzy, the droptargets do not reset. After the first quickshot mania, completing a drop target bank becomes more difficult (This is not valid for multiballs). If you hit a target, you have to complete the whole bank within about 30s, otherwise the targets reset. Hitting any droptarget resets the timer. MagnoSave(TM) becomes lit when all six drop targets were hit once.
Due to this fact, the secret skill shot gets more important.- Upper ramp:
Easy to hit with a slow moving ball from the upper flipper. Harder to hit with a fast ball. Nearly impossible to hit any other way. Normally spots a continent for 1M. Feeds to the top scoop and starts an exploration if the continent contains one. Feeds to the right inlane otherwise. The plunger shoots the ball in the upper ramp but this is normally not scored. During multiball this is sometimes scored, if another ball triggers the first switch in the upper ramp and falls back out shortly before a ball is autoplunged. Sometimes a hit of the upper ramp is not scored during multiball if you hit it at roughly the same time as a autoplunged ball.
When you aim for the upper ramp with the upper flipper and you hit the edge between the left drop target bank and the upper ramp, the ball often falls down to the base of the right flipper. Most of the time you can catch the ball on the right flipper, but sometimes the ball has a very strong counter-clockwise spin and rolls over the right flipper into the center drain. With a little practice, you should easily be able to recognise this behaviour of the ball soon enough to flip fast with the right flipper to prevent the ball from draining.- Middle orbit:
Very easy to hit from the right flipper. Contains a spinner. Each spin is worth 10K. Used to light the lock (see time machine frenzy). Normally feeds to the upper flipper. Locks balls if the lock is lit. Locking a balls scores 5M. You can unlight the lock temporarily if you catch the ball on the right flipper and flip the left one. (you don't really have to catch the ball. Hold the right flipper up at any time and after about 2 seconds you can switch the lock with the left flipper, which is very useful to disable the lock at ball start!). Briefly lights a second continent (the next in line) so you spot two continents if you shoot the middle orbit and then the upper ramp.- A-target:
Easy to hit. See W-target.- Middle scoop:
Not quite so easy to hit because of the A-target and the R-target. Can be lit for scan, superscan, time warp frenzy, videomode, extra-ball and lock (crystal-lock, not the normal one). Sends balls directly to the right flipper. Scores 2500.- Crystal:
Can be hit through the middle scoop if you succeed in collecting a crystal fragment in time machine frenzy. Cycles to feed the balls to the time zone lock points.- R-target:
Easy to hit. See W-target.- Bumpers:
Score 10K? (see superjets). Easy to send the ball here through the left orbit and top scoop. Can be disabled by holding both flippers up.- Bonus-rollover-lanes.
Score 5K. Increase the bonus multiplier if both are lit. Can be cycled with the flipper buttons.- Top scoop.
Easy to hit through the left or right orbit. It normally feeds to the bumpers except during quickshot mania, 'Channel Tunnel'-, 'Volcano'-, 'Stampede'-, 'Chariot'- and 'Pyramid'-exploration and at the beginning of the 'Antimatter plant'-exploration and quickshots. Here, the ball comes out of the left orbit. Scores awards and starts and scores quickshots.- Right target bank (N-E-T):
Easy to hit from the left flipper. Each target scores 5K. Lights the next quickshot in the right orbit if all three are hit. See Left target bank.- Right ramp:
Easily hit from the left flipper. Powers the time machine (see time travel). Scores 100K and feeds to the right inlane. Also used to score ways.- Right orbit:
Easily hit from the left flipper. Balls going here hit the top scoop if a quickshot is available or active or if the 'Antimatter Plant'-exploration is active, otherwise they come out of the left orbit.- Plunger lane:
This is where the ball comes from at the start. VERY hard to hit intentionally, but you never need to. No score.- P-target:
See W-target. Hittable with a moving ball from the left flipper. Hardest Target in my opinion.- MagnoSave(TM):
Hit the MagnoSave(TM) button to activate the magnet. Helps to keep balls off the outlane. Must be reactivated by shooting all M-A-G-N-E-T drop targets or using the secret skill shot. If you use MagnoSave and the ball comes to a total rest at the magnet, you can hold both flippers up to catch the ball on the left flipper. Use MagnoSave when you are not sure that the ball is going in the inlane or when you are not sure that you can keep it out of the outlane by nudging. Don't use it too early to prevent the magnet from sucking the ball in the outlane.- Right outlane:
Contains the N of S-C-A-N. See left inlane.- Right inlane:
Contains the A of S-C-A-N. See left inlane.- Slingshots:
Score 3,330.- Center drain:
Has a center post.- Time zone lock points:
See time machine frenzy.
There are four lock points:
- Prehistoric age lock point : Alpha light near the dinosaur
- Ancient Rome lock point : Beta light near the chariot
- Present day lock point : Gamma light near Mount Rushmore
- Distant future lock point : Delta light near the robot
Flashing lights indicate the actual time zone. Lit lights indicate locked crystal fragments.
Feature description: Ball saver:
At the start of each ball, the ballsaver is active for 20s. It re-launches the ball if it drains. Only 2 saves allowed per ball. This is not valid during multiballs. At the start of each multiball the ballsaver is active. The ballsaver can be randomly activated by scan or superscan. Only 2 saves allowed here, too.
Skill shot:
Try to hit the lit ramp or lane (left orbit, left ramp, middle orbit) at ball start for 5M. This value increases by 1M up to 10M for each successful skill shot or secret skill shot. Skill shot is also active when you lock a ball and launch a new one. Even when you lock a ball and an unlocked ball is in the magnolock, the magnolock feeds this ball to the left flipper and either the right orbit or right ramp are lit for skillshot. This happens when you start a new game while another one is in progress and you have locked balls or during multiplayer-games.
Secret skill shot:
Press both flipper buttons for about a second while the ball is still in the plunger-lane to activate the Secret skill shot. The plunger becomes analogue and you score half of the actual skill shot value if you hit the A of M-A-G-N-E-T. If quickshot mania is lit, you get twice the actual skill shot value. In addition the next award and quickshot are lit and MagnoSave(TM) is reactivated if it was off. The secret skill shot can't be activated when launching a new ball after locking, but after locking a fragment.
Bonus multiplier:
Light both bonus rollover lanes to increase the bonus multiplier by 1. The flipper buttons switch the lit lane. The multiplier is set to 1 at the beginning of each ball unless you had multiplier held at the previous ball. The first time you reach a bonus multiplier of 25, extra ball is lit.
Bonus:
At the end of every ball you get the following bonus unless you got TILT:
Bonus multiplier * (scanner * 25K + ways * 50K + continents * 100K + souvenirs * 250K)
ALL scanners, ways, continents and souvenirs count, not only the one you score with that ball.
Credits:
Credits can be used to buy up to three buy-in-extraballs at the end of each game. If you do so, you can't get a high score; instead you can get a buy-in high score.
A maximum of 3 buy-in-extraballs are available per game. Credits are stacked up to 10.
You can get credits during the game (when you reach the replay score), at the end of any game (with the probability of 1/10), with special as a scanner award and for achieving any highscore.
Super jets:
Hit the bumpers 100 times to increase the super jets level by 1. The game starts with a super jets level of 0. The super jets level is reset to 0 at the start of each ball unless you have jets held. Jets held keeps the super jets level and the number of bumper hits needed for the next level.
Maximum super jets level is 3. Flashing bumpers indicate the super jets level. Lit bumpers indicate jets held.
With super jets level one, every hit of a bumper scores about 1/3 of a million (3 bumperhits total 1 million), with level two 2/3 of a million and with level tree one million.
Awards:
In the left orbit, the following awards can be lit (from bottom to top)
- Hold multiplier
Holds the bonus multiplier to the next ball.- Hold superjets
Holds the superjets Level and the number of bumper hits you need to activate the next one- Light videomode
- Super warp
Starts super time warp frenzy.- Mystery
The first time you get this it always lights extra ball at the middle scoop. Any other time it starts super spinner if collected during multiballs or any mode (exept quickshots, which is not really a mode). If no mode or multiball is running, you get reverse frenzyShoot the top scoop through the left orbit to collect the next lit award. Shoot M-A-G to light the next award. Scan or superscan can also light awards. More than one award can be lit at a time, but only one can be collected next. The awards stay lit until quickshot mania is started.
Paradox awards:
If you shoot the left orbit with no award flashing you get the paradox award, which seems to be a random score (10 - 9,999,990). You don't need to hit the top scoop. In tournament mode it always scores 99,990. Shooting the upper ramp when all continents are lit also rewards the paradox award.
Quickshots:
The right orbit can be lit for quickshots by completing the right droptarget bank. Start a quickshot by shooting the top scoop through the right orbit. Shoot the top scoop through the right orbit again to collect the quickshot score and a souvenir. The faster you hit the more points you get. You get at least 1/10 of the original quickshot score for a successful quickshot. A started quickshot can be scored for nearly 20s.
Shoot N-E-T to light the next quickshot. Scan or superscan can also light quickshots. The first quickshot starts with 10M. The second one starts with 20M, etc. More than one quickshot can be lit at a time, but only one can be started next. If you collect a quickshot and the next is already lit, you start the next one immediately with the double quickshot score. When every award is collected and every quickshot started, both orbits are lit for quickshot mania and after that the awards and quickshots reset (the next quickshot starts again with 10M).
The quickshot count freezes when the ball is in any scoop, the bumpers or in the plunger lane (happens, when the ball is saved by the ballsaver).
Lock, videomode and scanner are disabled during quickshots.
Souvenirs:
With every successful quickshot you collect a souvenir. The kind of souvenir is determined by the number of the quickshot and the time zone you are in:
Prehistoric Age: Ancient Rome: A T-Rex tooth A bronze sword The first wheel A tyrian toga A dinosaur egg A death mask A baby pterodactyl A papyrus scroll An asteroid An ankh The Present: The future: A magnet A rocket board A pinball A hologram projector A mobile phone A ray gun A couch potato A Red Knight 3000 A pint of milk An anti-matter-battery A souvenir can be collected multiple times.
There are pairs of souvenirs that can be combined; When you collect a souvenir that can be combined with one you already have, the announcer says 'hmmm'. Start the scanner (not the superscanner) to connect them and the announcer says 'Souvenirs combined' and you get a special award. You can have more than one pair of souvenirs ready to combine, but you can only combine one pair with one scanner. There is a small bug here: If you collect the same pair of souvenirs twice without combining them, you can only combine one of them.
All known combinations:
- A mobile phone - A couch potato :
Very big points (100/150/200M)- A bronze sword - A ray gun:
Ultra jets (Bumperhits score 3M for 60s)- A t-rex-tooth - A baby pterodactyl:
Ultra bonus boost (by 10-20?)- A papyrus scroll - The first wheel:
Ultra spinner (3M/spin for 60s)- A pint of milk - A dinosaur egg:
Find the cow. One of the orbits or the left or the right ramp is the cow target for the rest of this ball. There is no way to see which one. Hitting it scores 5M * Number of hits to a maximum of 25M. The cow target changes each time you collect it.- An asteroid - A hologram projector:
Secret video mode. Much the same as videomode except that all awards are cows. You start in level 1. You can play level 1-3 if you hit not more than 5 mines all together. The number of hits is taken over to the next level. Same scoring as video mode. Secret video mode does not end if you fail to complete a level. There is no extraball after level 2, but after level 3 there is one. There is no level 4 in secret video mode.- A tyrian toga - A magnet:
Ultra magnosave. Unlimited use of magnosave for this ball and the next one.- A death mask - An Ankh:
Ultra ballsaver (90s)- A rocket board - A battery:
Special (A credit)- A Red Knight 3000 - A Pinball:
Extra ball quickshot. Shoot the right orbit in 15s to get an extra ball.Ways:
After shooting the left ramp or the right ramp, the other one briefly flashes for a way. Shoot x alternating ramps to get a x-way. An x-way scores x million. If you achieve a longer way than the actual ramp-champ, you become the new ramp-champ at the end of the game. Ways are almost always possible - even during multiballs.
Combos:
Combos are only possible, when there is no quickshot available or running and no Multiball active.
These are all possible combos:
- Right orbit + right ramp (combo, 5M)
- Right orbit + right ramp + middle orbit (double combo, 10M)
- Right orbit + right ramp + middle orbit + upper ramp (triple combo, 15M)
- Right orbit + right ramp + middle orbit + upper ramp + left ramp (super combo, 20M)
- Right orbit + right ramp + middle orbit + upper ramp + left ramp + middle scoop (ultra combo, 25M)
You get the scores for each single shot, so an Ultra Combo totals 5+10+15+20+25=75M.
A double combo lights all locks, a triple combo spots empty continents, a super combo powers the timedrive and an ultra combo gives you one souvenir of each kind in the current timezone. If you have the opportunity, try to do some combos, because the rewards are very valuable.
After right orbit - right ramp, the lock is temporarily disabled so you can continue the combo even if the lock is lit (or if it is the end of the 'Mount Rushmore'-exploration). After right orbit - right ramp - middle orbit, the upper ramp will not start any exploration or global domination.
After shooting the right orbit, the right ramp and the right orbit are lit, but right orbit - right orbit is not a combo. Instead, it increases the bonus multiplier (by 2-5?).
Reverse combos:
This is the only reverse combo:
Left orbit - upper ramp
It's hard to do this intentionally, because the ball has to hit the space between the right bonus rollover lane and the top scoop, but if one aims for the left orbit the ball always hits the top scoop (scores 10M).
Continents:
There are seven continents displayed in the middle of the table:
- Europe
- Australasia
- Antarctica
- North-America
- South-America
- Asia
- Africa
(from top to bottom)
Two continents in each time zone contain an exploration. If you hit the upper ramp and the flashing continent does not contain an exploration, the continent becomes lit and you score one continent. If it contains one, the explorations starts. If you complete the exploration, the continent becomes lit and you score one continent.
Shooting the middle orbit briefly lights two continents. If you hit the upper ramp now, one of the following things happens: If none of the two continents contain an exploration, both of them become lit and you score two continents. If one of them contains an exploration, the other is lit immediately, you score one continent and the exploration starts. If both continents contain an exploration, the first one starts. If there is only one continent left and it contains an exploration, the exploration starts. If there is only one continent left and it does not contain an exploration, it becomes lit and you score one continent.
After spotting all seven continents, Atlantis starts flashing (between North-America and South-America). Shoot the upper ramp again to start global domination. You can't spot the last continent and start global domination with a middle orbit - upper ramp combination. Starting global domination scores one continent.
The bumpers switch the flashing continent. That means it is possible to choose which continent will be spotted next by disabling the bumpers at the right moment.
It is also possible to select a continent at the start of the ball (even when you activate secret skill shot but that's a bit tricky).
You get big points (25M increased by 25M each time you get big points) for every 5 continents and extra ball is lit for 12 continents.
Global domination:
Light all continents including Atlantis to start global domination. The continent-lights now show the score, that You get for any hit. All switches score 500K * lit continents for one minute. Europe is already lit at the start. Shoot upper ramp to light a continent or middle orbit - upper ramp for two continents. If you light all continents, all switches score 5M.
If all continents are lit at the end of global domination, global domination is completed. (no additional score) When global domination ends, all continents are lit again.
Try to light all continents as fast as you can. Now go for the spinner or the bumpers. It's a good idea to have time warp frenzy or super time warp frenzy lit before you start global domination. The best seems to be to light a time warp frenzy (not a super time warp frenzy) as fast as possible. The upper ramp will now light continents and add balls. If you find it easier to hit the upper ramp with a single ball, light all continents and then start the frenzy.
Explorations:
You have to finish some explorations (missions) to get to all time zones. Completing an exploration gives you a piece of tachyonium, lights the continent and scores a continent. The following continents contain explorations:
- Prehistoric age:
- Asia (volcano): Time 60s
Shoot the spinner to collect water (10M).You can collect up to 2 buckets of water. Shoot any ramp to drop the water in the volcano for 33% or 66% (10M). Repeat this until you have 99%. Shoot the middle scoop (50M) for the tachyonium. Score for the completed mission is unlimited according to how many buckets of water you collected (You can collect and drop as many water as you wish before shooting the middle scoop for 10M per shot).
The best way to complete this mission is to repeat middle orbit - upper ramp until you have 99%.- Australasia (dinosaur stampede): Time 60s
Shoot the left orbit then the right orbit. The orbits start to flash alternately. Shoot two more correct orbits. Each orbit gives you 25%. Scores are 10M/10M/15M/65M.- Ancient Rome:
- Europe (chariot race): Time 60s
You have to win the race. You start in 4th place. The left/right orbits/ramps are lit. Hitting a orbit/ramp on one side either steers your chariot to that side or brings you one place forward (slowly flashing orbits/ramps). If you collide two times from the side with another chariot, this chariot crashes and you advance one place (fast flashing orbits/ramps). Each shot is worth 10M. If you are behind another chariot and you steer to the same side, nothing happens and the announcer says 'Try going around'. This scores nothing.
Completing this mission adds 50M. You can get more than 100M if you collide with other chariots (up to 140M).
The best way to complete this mission is to aim for the ramps, because the ball is fed to the other flipper, you can shoot again immediately and you score ways.- Africa (pyramid): Time 70s
Shoot the middle scoop to open the door for 25M. If you fail to do so before you have 53 seconds left, the middle scoop becomes lit and you don't have to hit it any more. Shoot all orbits, the left ramp and the right ramp to collect the tachyonium.
Each shot scores 5M and adds 16/17% (Three shots sum up to 50%). Flashing lights indicate targets you have not hit yet and lit lights indicate targets you already hit. Score for the completed mission is 100M if you hit the middle scoop in time and 75M if you don't.
Try to do a combo in this mission.- Present:
- Europe (channel tunnel): Time 60s
Shoot the right orbit to start mining. If you fail to do so, you automatically start mining when you have only 45s left. Shoot lit orbits and ramps to increase mining power until you think you reach 99% fast enough (You normally need two or three hits). Catch the ball on the right flipper, wait for the 99% and shoot the left orbit for the tachyonium (scores 100M).
If you start this exploration during a quickshot, you can collect the quickshot although the right orbit does not feed to the top scoop normally during this exploration. Try to do a combo in this exploration.- North America (Mount Rushmore): Time 60s
Shoot all three ramps and then the middle orbit. Each hit gives you 25% The scores are 5M,15M,30M,50M, totalling 100M. Shooting the middle orbit when it is lit sends the ball to the magno lock. The ball is immediately ejected from there; hold both flippers up to catch the ball on the right flipper.- Future
- Antarctica (anti-matter-plant): Time 60s
Each bumper hit scores 1-3% and 1M?. After the ball exits the bumpers the left/right orbits light briefly for a 29% advance.The number of bumper hits required to complete the mode is fixed (assuming you don't get any of the 29% orbit awards). Both orbits feed to the bumpers. At 98% you have to hit the left orbit to get the tachyonium. You can get more than 100M in this mission if you get the 29% when you already have more than 69%.- South-America (robotwar): Time 70s
Each drop targets score 10% and 5M. Hitting a target resets the opposite bank, so you can't only shoot drop targets on one side. Complete a bank to get 'Go for the uppercut!'; The upper ramp will be lit. Hit it to get 50% and 25M. The upper ramp remains lit even if the drop target bank is reset. Completing a bank also re-lights magnosave. Left/right ramp/orbit decrease the score by 5%. This exploration resets the drop targets at mission-start. Drop targets lit at the end of the mission remain lit.
Completing the mission adds 50M. Completing this mission normally scores 100M, but you can get more points if you hit the uppercut when you already have more than 50% or when you have to hit more than 10 drop targets when you hit the left/right ramp/orbit.Note that the timer for the explorations starts at the moment you hit the upper ramp. This makes a difference if you have more than one ball in play (i.e. you did a bang back during ballsaver or started a new game during multiball). In this case you can start making shots for the exploration as soon as the first ball hits the top scoop.
Quickshot, videomode, lock and the scanner are disabled during all explorations.
Scanner:
Complete S-C-A-N to light the scanner. Hit the middle scoop to activate it. The scanner gives you a random award. Press both flipper buttons to stop the scanner at will (but you can't select the award). 5 completed S-C-A-N (after you collected the last superscanner) lights superscanner instead of scan (the SCAN-light flashes). Extra ball is lit after 10 and 100 completed S-C-A-Ns.
These are all known awards:
- Activate ballsaver (30s)
- Advance awards (by 1)
- Advance timedrive (by 20%)
- Advance quickshot (by 1)
- Boost multipliers (by 2-5)
- Light lock
- Light MagnoSave(TM)
- Small points (see below)
- Spot W-A-R-P letter
- Start exploration
You will see other awards while scanning, but you will not get one of those unless you combine souvenirs
Range for small points: 100K-1M in 100K increments
Press both flipper buttons or the launch button during small points to get very small points: 10-90 in 10pt increments
Note that you only get awards that you can use, i.e. you won't get advance timedrive when the timedrive is already powered. You will never get start exploration if the lit continent does not contain one.
Superscanner:
Complete S-C-A-N five times (after the last superscanner) to light superscanner. Superscanner lets you choose one of two random awards with the flipper buttons. (left button for the one on top). If you don't choose, the first option is selected after a few seconds.
- Enable timedrive
More useful if this is not the first time the timedrive gets powered, because you only need 5 sideramps to power it the first time. Later on you need 10 ramps.- Light all awards
After the first quickshot mania, this option is quite good, because it gets harder to light awards now.- Light all locks
Not very useful if this is the first time you light the locks, because you only need to light the L-I-T-E lamps once to light all locks.- Light all quickshots
After the first quickshot mania, this option is quite good, because it gets harder to light quickshots now.- Light timewarp
Select this if you have any mode ready in which it is useful to have a time warp frenzy lit.- Light videomode
This option is very good, because you can collect an extra ball during videomode. Even if you can't collect any more extra balls, this option is good, because you can get up to 300M + Big points without risking to loose the ball.- Ramp rampage
Only select this if you are good in hitting the side ramps or if time warp frenzy is lit, so it will start along with ramp rampage.- Spot empty continents
Depends on how many continents are already lit. Very useful if you reach 12 continents when selecting this option.- Super ballsaver (60s)
- Super bonusboost (6-9?)
Very useful if you come near 25x for the first time when you select this option.- Super jets
- Super Magnosave(TM) (Magnosave(TM) remains lit after using it)
- Superspinner
Only shortly after midnight:
Again, you only get awards that make sense. The awards are not only randomly selected. For example, you often get spot empty continents when you have no continents lit. You always get ramp rampage at the first superscan after you powered the timedrive. You never get ramp rampage, if the timedrive is not powered.
Videomode:
Collect awards (clowns? teddy bears?) and avoid mines. The video mode ends when you hit 5 mines in one level. All awards score 1M, except in level three where they are worth 2M. The last award in level one is worth 10M, in level two 20 M and in level three 80M. Collecting all awards in level one scores 25M, in level two 50M and in level three 150M.
Level four is the same as Level three, but the middle sequences apear in random order. The scoring is the same.
You need to collect every award to get to the next level. You can't play more than 2 levels in one videomode. Achieving a perfect level (collect all awards and get not hit) scores twice the score. If you collect all awards in a level, every time you get video mode again, you start in the next level.
You get an extra ball as the last award in level 2, 3 and 4 if you collected all awards in it. Level 4 is the last level, if you complete level 3 or 4 as the first level in a video mode, the video mode ends. Once you completed the third level, you only play level 4 every time you start video mode again.
If you have a low score at the start of the third ball (<50M), videomode is lit.
Ramp rampage:
The only way to get ramp rampage is as an award in super scanner.
In this mode, you have to try to shoot five left and five right ramps in 60 seconds. The display says something like
'Shoot next ramp for x million * T'
where x is 1 and T is 5 at the beginning. T is reduced by 1 (but never below 1) every 5 seconds. Hitting a ramp scores x million*T and increases T and x by 1 (T up to the limit of 5).
The 10 lights that normally indicate the time drive power count the ramp hits. Hitting the left ramp lights a light on the left side and vice versa. Hitting a ramp when all 5 lights on this side are lit does not score any millions and does not light any lights.
Ramp rampage is completed when all 10 lights are lit. The last shot is always worth 100M. The upper ramp is also lit and rewards 1M and sets T to 5, but does not increase the ramp counter. Ways do not count for points, but do count towards bonus and Ramp Champ.
Quickshot mania:
After collecting all awards and starting all quickshots, the left and the right orbit are lit for quickshot mania. The goal of this mode is to start and collect up to ten quickshots as fast as possible.
Quickshot mania starts with a time limit of 30 seconds. Hitting drop targets at the left bank lights the left orbit for quickshot. Hitting drop targets at the right bank lights the right orbit for quickshot. Each time a drop target gets hit, 5 seconds are added to a maximum of 33.33 seconds.
Hitting a quickshot scores 1M*Time*Number of Droptargets down on this side. Additionally, 5 seconds are added to the quickshot mania time and the corresponding drop target bank is reset. Additionally it lights as many orbit lights as drop targets of the corresponding bank were lit. You don't need to hit the top scoop to score a quickshot on the left side. The right orbit feeds to the left orbit.
If all 5 lights on one side are lit you can still hit the remaining drop targets on this side (They will not reset again and do not add 5 seconds), but the quickshot on this side will not be lit again. Lighting all ten orbit lights completes the quickshot mania. The last quickshot is allways worth 100M. A completed quickshot mania is normally worth 300-350M.
I like to start time warp frenzy during quickshot mania, because the drop targets get hit more often and you have a ball saver, but opinions differ here.
During quickshot mania, the quickshot score continues to decrease while the ball is in the bumpers or in any scoop.
Superspinner:
Super spinner can be started as an award at super scanner and as the second mystery-award.
The spinner is lit for 30s. Each spin scores 1M. Each hit of the middle orbit increases this score by 100K and adds 10 seconds. There is a maximum to the total time of Super Spinner (presumably 180s).
Time warp frenzy:
This is a multiball with 2-4 balls, that has no special purpose for the main goal of the game, but since you can start it almost always, it is useful to help you completing other modes.
Complete W-A-R-P in the correct order to light warp at the middle scoop. If you complete W-A-R-P in the correct order again before starting time warp frenzy, the add-a-ball-time is increased by 15s. The ballsaver lasts as long as the add-a-ball-time (three seconds longer, if you have 3 balls in play).
Time warp frenzy starts as a 2-ball-multiball (If you already are in a multiball, time warp frenzy adds one ball, except you already have four balls). The dotmatrix displays the add-a-ball-time. Complete W-A-R-P in random order or shoot the upper ramp to bring one more ball into play. You can have up to four balls in play.
It's probably best to ignore the left flipper, shoot all launched balls through the middle orbit and try to shoot the balls coming from there with the upper flipper to the upper ramp until the ballsaver is off.
At the beginning of time warp frenzy, the display shows:
'Jackpot: 10 000 000 * 1'
Complete W-A-R-P or shoot the upper ramp to increase the jackpot multiplier by one. Hitting the upper ramp resets W-A-R-P. Hitting any W-A-R-P-target - lit or unlit - adds 500K*(balls in play) to the jackpot and scores 500K*(balls in play).
Hitting the middle scoop collects the jackpot, sets it back to 10M and the multiplier to 0. That means you must complete W-A-R-P or hit the upper ramp to light jackpot again.
Quickshots, scanner, videomode and lock are disabled during time warp frenzy.
I think this multiball is quite useless unless started in other modes, so spare it for something like time machine frenzy or so. If you have a time warp frenzy on it's own, shoot with the right flipper for the middle orbit and with the upper flipper for the upper ramp and ignore the left flipper until the ballsaver expires. Try to power the time drive, shoot the drop targets and go for the bumpers.
Super time warp frenzy:
The super time warp frenzy starts when you collect the 4th award. It is pretty much the same as the above except that it is a 4-ball-multiball and it is not possible to add additional balls.
Time machine frenzy:
This is the main multiball in Timeshock. Here, you collect the crystal-fragments and travel through time.
First, you have to light the lock. Below the spinner there are the L-I-T-E lights. If all four light, the middle orbit gets lit for lock. Each of these needs several spins to light (about 4 or 5). Unfortunately, every 20 seconds a light goes off. But it is easy to light lock anyway. Sometimes a very fast shot through the middle orbit does the job. Two shots in a short time are almost always enough to light lock. At the beginning of a new ball the L-I-T-E lights are always unlit.
Then you have to lock three balls by shooting them through the middle orbit. The time machine frenzy starts immediately if the time drive is not powered. If it is, see time travel below.
Time machine frenzy is a 3-ball-multiball. The aim is to light all seven continents by collecting jackpots. The left ramp and the right ramp are lit for jackpot. If any of these is hit, a jackpot is rewarded and the opposite ramp is briefly lit for double jackpot. If this ramp is hit, a double jackpot is rewarded and the opposite ramp is briefly lit for triple jackpot. You can collect unlimited triple jackpots by continuing to alternate ramps. Shooting a ramp while the other is lit for double or triple jackpot resets the timer for this jackpot.
A single jackpot lights one, a double two and a triple jackpot lights four continents. That means, all seven continents are lit if you succeed in collecting a triple jackpot. Of course you can collect any combinations of jackpots to light the seven continents.
The jackpot value starts at 10M and is increased by 100K for each spin of the spinner and by 1M for the upper ramp.
When all continents are lit, the middle scoop is lit for collecting a crystal fragment. Get it, score 50M and the super jackpot is lit. You can't collect jackpots while the middle scoop is lit.
You can collect single, double and triple jackpots when super jackpot is lit. Hit the upper ramp to collect the super jackpot (jackpot value * 5). This will reset the continent lights and all jackpots to normal (This means you can't collect triple/super/triple). Now collecting jackpots lights continents again. Lighting all continents without collecting a triple jackpot lights super jackpot again.
Shoot a triple jackpot to light ultra jackpot for about 10s. Shoot the upper ramp while ultra jackpot is lit to collect it. The ultra jackpot score starts at 100M and every jackpot (normal/double/triple/super) adds it's value to this up to 500M. If you collect the ultra jackpot, the score is reset to 100M and you have to collect a super jackpot and a triple jackpot to light it again.
If you fail in collecting the ultra jackpot, the super jackpot gets lit. Collect a triple jackpot to light ultra jackpot again.
If you do not succeed in collecting the crystal fragment when it is lit and you lose all balls but one, you have about 15 seconds to do so now. This timer pauses, if the ball is in the bumpers. If you fail to collect it even now, you are able to do that right at the beginning of the next time machine frenzy in the same timezone.
After the frenzy ends it is time to lock the fragment in place (if you collected it). Do so by shooting the middle scoop. The ball is sent through the crystal to the lock point of the actual time zone, you score 50M again and a new ball is fed to the plunger lane. Press both flipper buttons to stop the animation. Locking the 4th fragment the first time lights extra ball. As long as the crystal is lit for lock, the video mode, the scanner and the paradox award are temporarily disabled.
Lighting lock after the first time machine frenzy allows to lock only one ball. One has to light lock and lock one ball three times to start the frenzy again. Normally, it is advisable to lock a ball as fast as possible when lock is lit, because in most modes (i.e. explorations) it is possible to light the lock, but impossible to lock a ball. The number of jackpots scored in previous time machine frenzies (in the same timezone) is taken over to the next one, so you have to score less than seven jackpots there to gain the crystal fragment or to light super jackpot.
Quickshots, scanner, videomode, lock and the W-A-R-P-targets are disabled during time machine frenzy. The M-A-G-N-E-T drop targets do not reset in time machine frenzy.
At the start of time machine frenzy the ballsaver is activated for 30s. It is possible to start a time warp frenzy during a time machine frenzy. This will add another ball into play (up to four), start a new ballsaver and a add-a-ball-time if you do not have four balls in play. It is possible to start super time warp frenzy during time machine frenzy.
Strategy:
Shoot for the left/right ramp until the ballsaver expires. Ignore every ball that is not in position to shoot for the ramps. If you can collect the crystal fragment or the super/ultra jackpot before the ballsaver expires go for this. You should have a (super) time warp frenzy lit when you start time machine frenzy. If you have only 2 balls in play you should start one of these. Doing this, you have more balls and a ballsaver to concentrate on the important things again. Don't go for the time warp jackpot until it is very high, let's say 50M. It is better to go for jackpots, super jackpots and ultra jackpots.
At the start of time machine frenzy, you can hold both flippers up when the balls are ejected from the magno lock to catch a ball on the right flipper. I usually do the following: Catch the first ball on the right flipper and try to hit the left ramp immediately. Catch the second ball on the right flipper. Try to hit the right ramp with the first ball, which should be coming down the left inlane, or the third ball. Shoot the left ramp with the second ball, which is still held on the right flipper.
Time travel:
You do this to change the time zone, because you have to lock one crystal fragment in every time zone.
First power the time drive with alternating shots to the left ramp and the right ramp. Doing this the first time, you need 5 hits, later on you need 10. The manual states that doing ways makes the power up faster, but I did not see this. At the start of any ball, both ramps are lit if they have the same number of hits, or the ramp with less lights is lit. After hitting a ramp, only the other one is lit.
Then lock three balls for time machine frenzy. Now you have to select the new time zone with the flipper buttons and the launch button. If you select the actual zone, a normal time machine frenzy starts, and the time drive remains powered.
For some time zones you need pieces of tachyonium to travel there. These can be collected in explorations. Below is a list of time zones and the number of tachyonium needed:
- The dawn of time: 3 + 4 crystal fragments
- The prehistoric age: 2
- The ancient Rome: 1
- The present: 0
- The future: 0
- The unknown: 8 + timeshock frenzy completed
During the selection of the new time zone, a crystal fragment on the right side of the display indicates that you already locked the fragment in that time zone and the continent lights indicate the continents that are already lit.
After selecting a time zone, you have to hit the middle scoop to start the time travel (you can hit the launch button to stop the animation). Now a time machine frenzy with 4 balls starts. As long as the crystal lock is lit time warp frenzy is temporarily disabled.
The time drive is unpowered again after time travel.
Reverse frenzy:
This frenzy sometimes gets started by the second mystery award.
This is a 3-ball-multiball, but the flipper buttons are exchanged: The button for the left flipper controls the right flipper and vice versa. The upper flipper is still controlled by the right button.
There are probably two techniques to handle this:
- Always press both flipper buttons or
- Just turn the keyboard around ;) (I prefer this)
The following targets are lit:
- Left ramp
- Right ramp
- Upper ramp
- Left orbit
- Right orbit
- Middle orbit
- Middle scoop
Each target awards 5M. Hitting all seven targets the first time lights the reverse extra ball at the middle scoop. Hitting all seven targets again rewards very big points (100M/150M/200M). At the end of reverse frenzy there is a brief ballsaver to prevent loosing the ball. Hit targets are not taken over to the next reverse frenzy.
Midnight madness:
If you play a game over midnight, the next time you get Superscanner, you can choose midnight madness.
Midnight madness is a 10-ball-multiball with a very long ballsaver (240 seconds). All switches score 10. All lights are unlit, so it's hard to tell which features are available during midnight madness. At least, you can score S-C-A-N, W-A-R-P, Droptargets and bonus multipliers.
You won't get many points in midnight madness, but you will light S-C-A-N and W-A-R-P often, advance the multiplier and the jet level and hit the droptargets making midnight madness quite useful.
Timeshock frenzy:
This multiball is the first main goal of Timeshock! Here you put the four collected crystal fragments together again to create the shockwave which will save the world.
Time-travel to 'the dawn of time' to start timeshock frenzy. This is a five ball multiball and lasts 120 seconds. The ballsaver last all the time.
The left/right orbit/ramp are lit. After shooting one of those the middle scoop is lit for lock. Note that this may take a while since the crystal has to turn to the correct position. Lock a ball (25M increased by 25M for every ball locked). Repeat this for all four targets. Finally shoot the middle scoop (750M) to successfully end the timeshock frenzy for a total of 1B.
If you complete timeshock frenzy faster than the actual master of time, you become new master of time at the end of the game.
You start again in the present if you fail to complete Timeshock frenzy. In this case you have to time-travel to 'the dawn of time' again to replay it. In order to do this, you have to lock every crystal fragment you did not lock during Timeshock frenzy again with a time machine frenzy. If you locked all four pieces, but missed the final shot, you only have to power the timedrive again and time-travel to 'the dawn of time'.
If you complete the timeshock frenzy, you have the oportunity to time-travel to a timezone of your choice. Timeshock frenzy does not reset the continents or tachyoniums, so everything you have to do to start the next timeshock frenzy after a completed one is to lock the four crystal fragments again.
During timeshock frenzy, all switches are disabled, so you score nothing but the 1B.
Wizard Frenzy:
This is the most difficult goal in Timeshock!
You have to collect all 8 pieces of tachyonium and win timeshock frenzy to get this. You don't have to collect the tachyonium before you play timeshock frenzy. Time travel to 'The end of time' (this was 'The unknown' before), shoot the middle scoop and the wizard frenzy starts. This is a 6-ball-multiball and lasts for 60 seconds.
The following modes are active:
- Time Machine Frenzy
- Quickshot mania
- Ultra jets
- Ramp rampage
- Ultra spinner
- Ultra find the cow
- Ultra time warp frenzy
- Global domination
If you score 1B during wizard frenzy, extra ball gets lit. You must collect the extra ball during the frenzy or it will go away.
Strategies: Overall strategy:
You can devide the features of Timeshock! into the following sections:
It is not nessecary to concentrate on scans and time warp, read the sections below. Time machine frenzy is very important, since timeshock frenzy and wizard frenzy are the main goals in the games. You should try to collect the crystal fragment in the time machine frenzy, that starts directly after time travelling. Do not starttime machine frenzy in a timezone, in which the fragment is already locked. You need three pieces of tachyonium for timeshock frenzy, but as soon as I have them, I do not concentrate on continents anymore. After the timeshock frenzy I try to complete the remaining explorations and to lock fragments again.
Normaly, I try to do the following at the start of a new game:
First, I shoot middle orbit and upper ramp until I light lock or start an exploration. I do this until I light lock. Now I collect the first three awards, if they are lit. Thus, I am able to start a super time warp frenzy in the time machine frenzy. Hopefully, I collect the crystal fragment. Now I repeatedly shoot middle orbit and upper ramp again until I locked two or three balls. This is the time to complete the continents to start Global Domination, if you only need a few of them. Bevor I change the time zone, I try to get the second souvenir in the present (extraball quickshot). Now I travel to a new time zone and continue in a similar way.Awards and quickshots bring a lot of points, too, but they are not as important as the crystal fragments. See separate section below.
Extra balls:
You can only get 10 extra balls per game. Every extraball you collect after that only scores big points (25M, increased by 10M for each time you get it). These big points have nothing to do with the big points you get for continents.
This is a listing of all extra ball you can only get once:
- 10/100 scans:
You should get the 10 scan extra ball in every game. Perhaps you will also get the extra ball for 100 scans but it makes no sense to go for it unless you already have 90-95 scans.- 12 continents extra ball:
You should get this in every game.- 1st mystery award:
Same as above.- Bonus x25 EB:
If you are not sure to collect this anyway, it might be a good idea to try to get the bonus to 25 in the first 2 balls (assuming that you collect bonus held with the first ball).- Reverse frenzy:
Make sure that you collect the 5th award when you are not in a multiball mode. If you are in a multiball mode, you get superspinner where you can get a lot of points, but no extra ball. This is not valid for the first time you collect the fifth award because you always get light extraball there.- 4 crystal fragments locked extra ball (see time machine frenzy)
The extraballs listed below can be collected unlimited times:
- Video mode:
You can get an extra ball in video mode level 2, 3 and 4 (This means you can get an extra ball every time you start a video mode). If you get 'light video mode' at super scanner, you should select this.- Extra ball quickshot:
Make sure that you get the 2nd souvenir in the present and the 4th souvenir in the future.- Secret video mode:
Make sure that you get the 2nd souvenir in the future and the 5th souvenir in the prehistoric age.- Wizard frenzy extra ball
Summary:
As you can see, you have to collect awards and quickshots for the most EBs. I think that it is not necessary to care much about awards, since most of the time I collect them during multiballs and most often, I collect 5 awards before finishing the quickshots. Probably the best way is to wait until a few quickshot lights are flashing, so you need less right orbits and get more points. For the extra ball quickshot and the secret video mode it seems to be best to collect the 2nd souvenir in the present and travel to the future as soon as possible. There you can collect the 4th souvenir, finish the quickshot mania and collect the 2nd souvenir. Now you should have enough tachyonium to travel to the prehistoric age and collect the 5th souvenir.
Time warp:
Since time warp frenzy is not so important and the W- and the P-target are hard to hit, it has no use to concentrate on lighting time warp frenzy, if you have a mode available, in which time warp frenzy can help. If this is the case, I try to do something else until time warp frenzy is lit. Normaly, I aim for the A- and the R-target, if these are the next in line and ignore the W- and the P-target. The best way to hit the A-target is with a catched ball from the right flipper, so that the ball goes in the middle orbit after that. The best way to hit the R-target is with a catched ball from the left flipper, so that the ball goes in the bumpers after that. You should not start (Super) time warp frenzy alone if you do not want to power the timedrive.
Awards and quickshots:
I do not aim for the droptargets, except I only need to light one or two quickshots to get an important souvenir before I change the time zone. If all quickshots are lit, I collect them as fast as possible. Normally, I already collected all awards at this moment, since the left orbit gets often hit during multiballs. If I start a quickshot, I collect every quickshot that is lit.
You should start quickshot mania as fast as possible, if it is lit. After the first quickshot mania I sometimes aim for a droptarget to prevent the droptarget banks from resetting. It is best to start any multiball with as many droptargets up as possible, since you can only complete the droptarget banks once in a multiball. So if you have only one drop target up, it is a good idea to hit it before starting a multiball, assuming that you have no more than three awards or quickshots lit.
Try to keep the multiplier and the jets held as long as possible. I once had a super jets value of nearly 1B and a bonus of over 500M. Never collect jets held or multiplier held twice with one ball.
S-C-A-N:
Make sure that you spot a letter every time you launch a new ball after locking another one and every time you hit the left or the right ramp. (If you are aiming for the left or the right ramp with a held ball, make sure that the outlane of the side you are aiming for is unlit.) Sometimes you might want to prevent to complete scan if you have scan ready and want to combine some souvenirs. Try to collect a super scan as soon as possible to prevent completing too many S-C-A-Ns before collecting it. Scans are less important, I only go for these when I have no other target for a held ball or when I want to combine souvenirs.
Ways:
Only go for ways, if you power the timedrive with it. (If you just shot an 15-way, you should naturally continue. ;) This might be wrong, if you are very good in hitting the ramps, but I think that aiming for the ramps is relatively risky with a moving ball.
Slingshot-passing
If you catch a ball on any flipper and you want to bring it to the other side, you can do the following: Hold both flippers up, release the flipper with the ball on it for a short moment and bring it up again. The ball should hit the lower edge of the slingshot and bounce to the other flipper.
During a multiball, you can do something similar if you caught two balls on one flipper and you want to send one of them to the other one. Release the flipper and wait a bit longer until you bring it up again. The ball should hit the slingshot a bit higher in a way the slingshot shoots the ball to the other flipper. The other ball should remain on the first flipper.
Catching a ball coming out of the left orbit:
If the ball is coming out of the left orbit (i.e. when it is ejected from the top scoop in some modes) hold the left flipper up. A split second before the ball touches the left flipper, release the button and press it again as fast as you can. The flipper should not move at all. Doing this in the right way, the ball comes to a total stop at the point where it touches the flipper. You can do this in any situation the ball heads towards any flipper in a similar way even if it is much slower.
Catching a ball coming out of the middle scoop:
There are different ways to catch a ball coming out of the middle scoop:
- Hold the right flipper up. Release the button a split second before the ball touches the flipper and press it again as fast as you can. Most often, you can catch the ball on the right flipper.
- Hold the right flipper up and release it at the moment the ball touches the flipper. Doing this in the right way, the ball comes to a stop at the right flipper and starts to roll down towards the center drain. Now you can easily aim for the left orbit or ramp. This technique is very hard to handle.
- Hold the right flipper up and nudge to the left at the moment the ball hits the flipper. This is very easy to master and the ball will almost always stay on the right flipper, but you risk getting a tilt warning. Only do this if you desperately need the ball on the right flipper fast.
- If you need the ball on the left flipper, don't move the right flipper and the ball will sometime go up the left inlane. Most of the time it will hit the edge of the left slingshot and go back to the right flipper or towards the center drain. Hold the left flipper up as soon as the ball hits the slingshot to prevent it from draining.
Saving left or right outlane drains (bang backs):
If the ball hits the left outlane and is heading towards the center drain, hold the left flipper up and nudge up and to the right (hard!). If you are lucky, the ball comes up to the right flipper. If not, the ball most likely hits the tip of the right flipper or the center post. Nudge up and to the right at the moment the ball hits the metal under the left flipper again. Don't do this if you already got the last tilt warning to prevent getting a tilt and loosing the bonus.
This can be done in a similar way if the ball hits the right outlane. It is easier to do this on the left side (most likely because the ball is slower). Bang backs are easier if the ball is slow. You can also do this if the ball drains through the middle and comes to a rest on the metal under any flipper.
Additional Tips:
- When playing Timeshock!, it is extremly important to know how to catch a ball and how to nudge the table. To learn about this, read the general pinball playing tips at The Pinball Pasture. All the advanced techniques work in Timeshock!, too.
- The different screen resolutions and table views play different (at least, they feel different). Try at least some of them, but make sure that the ball movement remains smooth (even with four balls and turning crystal during time machine frenzy).
- Don't fell rushed. If you only have a short time left to complete an exploration or something similar, don't try to hit the remaining target with every strange moving ball - do something save instead. You will only loose control. It is better to start the exploration a second time.
- You should collect Quickshot mania, superscanner and videomode as fast as possible, if they are lit.
- You can save a ball with a bang back, when the ballsaver is active. This way, you get two balls in play without having a multiball-mode. The game recognizes this and behaves correctly. This means, if you loose one ball, you can continue with the other and the game does not start the bonus-count. If you succeed in this, it seems to be best to start quickshots or shoot the crystal, if it is lit for time travel. As long as the time travel animation is running, you can start normal modes. These will run along with the time machine frenzy and thus are easier to compleete. This tip is from Erik Mooney - I do not succeed in bang backs often enough to try this out.
- On some computers it seems to be impossible for Timeshock! to recognise every combination of keys pressed (This is not a fault of Timeshock!). For successful playing it is very important to choose the keyboard layout in a way that Timeshock! recognises every combination of flipper and nudge keys. For example, it might be impossible to move any flipper if you nudge up and to the right at the same time. Make sure that you can nudge in any direction and move both flippers at the same time.
Try this is at the start of a ball, when the ball is still in the plunger lane. Make sure that there is a difference in the behaviour of the ball between nudging to a side and nudging up and to a side.
Remap the magnosave button to a key that is easier to reach than the backspace key. Otherwise you will find yourself still searching for the magnosave button when the ball is already drained. If you use the shift keys as flipper buttons, use the right control key as magnosave button. If not, use the key right to the right flipper button.- Cheat mode: When you are asked to choose between novice and normal mode at the beginning of the game, press BOTH flipper buttons. You will start in normal mode but in a randomly choosen time zone. Additionally, all empty continents are lit. Helps to learn the explorations in the other time zones.
Links:
- Jens Göring's Pinball Page
My Homepage- Empire's Timeshock! page
Demo, update, highscorelist and links.- The Tower of Pin
Everything about computer pinballs, including some more rulesheets for Timeshock!- The Pinball Pasture
General pinball playing tips that are valid for Timeshock!, too.- MPeach's Timeshock! Page
Technical information and tips- Simon Wikock's Timeshock Page
Tips- All about Games' Timeshock! Review
- Play Away's Timeshock! Review
- Games Domain's Timeshock! Review
- Gamespot's Timeshock! Review
Acknowledgements: I'd like to thank the following people:
- The Pro Pinball Team for creating the best pinball simulations around.
- Marcus Demker for providing a lot of additional information and proofreading.
- Erik Mooney for providing a lot of additional information
- Keith Johnson for providing a lot of additional information (esp. Timeshockfrenzy and wizard frenzy).
- David M. Smith for poviding additional information, corrections and strategies.
- Thomas Walz for providing information about midnight madness.
- Sebastian Breier for providing information about the European style format bug. (This bug is fixed since v1.02.)
- Pete Welland for proofreading (English version).
- Ludger van Elst for proofreading (German version).
- Jochen Fischer for providing information about the commandline switches.
- Marvin Jach for providing information about the exact Midnight Madness ballsaver time and Pitty Video Mode threshold
- Thanks, too, to the various persons that have sent me information about the cheat mode and the cheat to unlock the settings.
Availability: Available at my homepage:
Check for updates!
-------o0o------- I give permission to copy, post, and otherwise reproduce this document and the information contained herein as long as credit is given to me.
All pictures are most likely copyrighted by empire interactive.
© 1998 by Jens Goering